I managed to get a game in against Caleb last week, and take some pictures. We were both trying out some very new lists. I've been playing around with eHexeris as a possible ADR partner to Makeda 3 this season. He has a pretty decent set of tools for dealing with infantry, and runs a ranged list well, which I'll want against Cryx. I've been playing around with him a little bit, and this time I tried the following list:
Lord Arbiter Hexeris (*6pts)
*Aradus Sentinel (8pts)
*Aradus Sentinel (8pts)
*Cyclops Raider (5pts)
*Cyclops Brute - Bonded (5pts)
Siege Animantrax (9pts) - Proxied by the torso of a Siege Animantrax
Praetorian Keltarii (Leader and 9 Grunts) (8pts) - Proxied by Swordsmen
Venator Slingers (Leader and 9 Grunts) (6pts)
Paingiver Beast Handlers (Leader and 5 Grunts) (3pts)
Agonizer (2pts)
Extoller Soulward (2pts)
Objective: Arcane Wonder
So I really wanted to try out the Siege Animantrax, which I'd just picked up. I've always loved the goofy turtle model, but it was very hard to justify buying the thing for its adorable grin alone. It's been vastly improved in the latest rules errata, and is a very decent shooting platform, especially with Hexy 2, since Black Spot will give it more game against infantry as well as heavies, and Hexy's spell list is specialized enough that he doesn't mind spending half his stack on Far Strike most turns. I'm also trying out Keltarii, who have done well with eHexy in the last couple of games I've fielded them. The rest of the list is geared toward maximizing damage at range. I'd like to put some Croak Raiders in the list, but they're on back order, so maybe in a month or so I'll try them out.
My perennial opponent, Caleb, was trying out pMadrak's new theme force, Winter Kin. You can find his take on the theme list right here. He was running:
Madrak Ironhide, Thornwood Chieftain (*5pts) - Winter Kin Tier 4
*Glacier King (18pts)
*Troll Bouncer (5pts) - Proxied by Skaldi Bonehammer
*Troll Axer - Bron (6pts)
*Troll Impaler - Jor (Free)
*Trollkin Rune Bearer (2pts)
Warders (Leader and 4 Grunts) (8pts)
Warders (Leader and 4 Grunts) (8pts) - Proxied by Trollkin Champions
Kriel Stone Bearer and Stone Scribes (Leader and 5 Grunts) (4pts)
*Stone Scribe Chronicler (1pt)
Trollkin Skinner (2pts)
Trollkin Skinner (2pts)
Objective: Effigy of Valor
As Caleb mentions, the benefits for Winter Kin are pretty great. The Skinners get Beacon on their knives, the army has Concealment during the first round of the game, Madrak can start with Sure Foot up, and he gets a free Impaler in the list.
Caleb has decided to use the list to reinterpret the Miserable Meat Mountain, and I have to say it looks like a pretty tough nut to crack. The Glacier King is a fantastic Target for Sure Foot. Clustering the Warders around it will make them even more formidable, especially at range, where it can cover a massive footprint with both Sure Foot and Snowfall (for a total of +4 Def against ranged and magic attacks). The list can shoot, will be accurate with Carnage, and won't be swamped out by infantry spam very easily thanks to Madrak's Feat. Seems solid to me.
NOTE: This game is from before Warders were nerfed, something Caleb is still pleased about, but something that hurts this particular list a lot.
Scenario and Deployment
We rolled up Recon, which I'm starting to appreciate more as a scenario: it's got one central rectangular zone held down by an objective on either end. On the far outskirts of the table (12" from either edge) are 2 flags. Score one point for controlling the zone, two points for dominating it, one point for destroying your opponent's objective, and one point for dominating one of the flags.
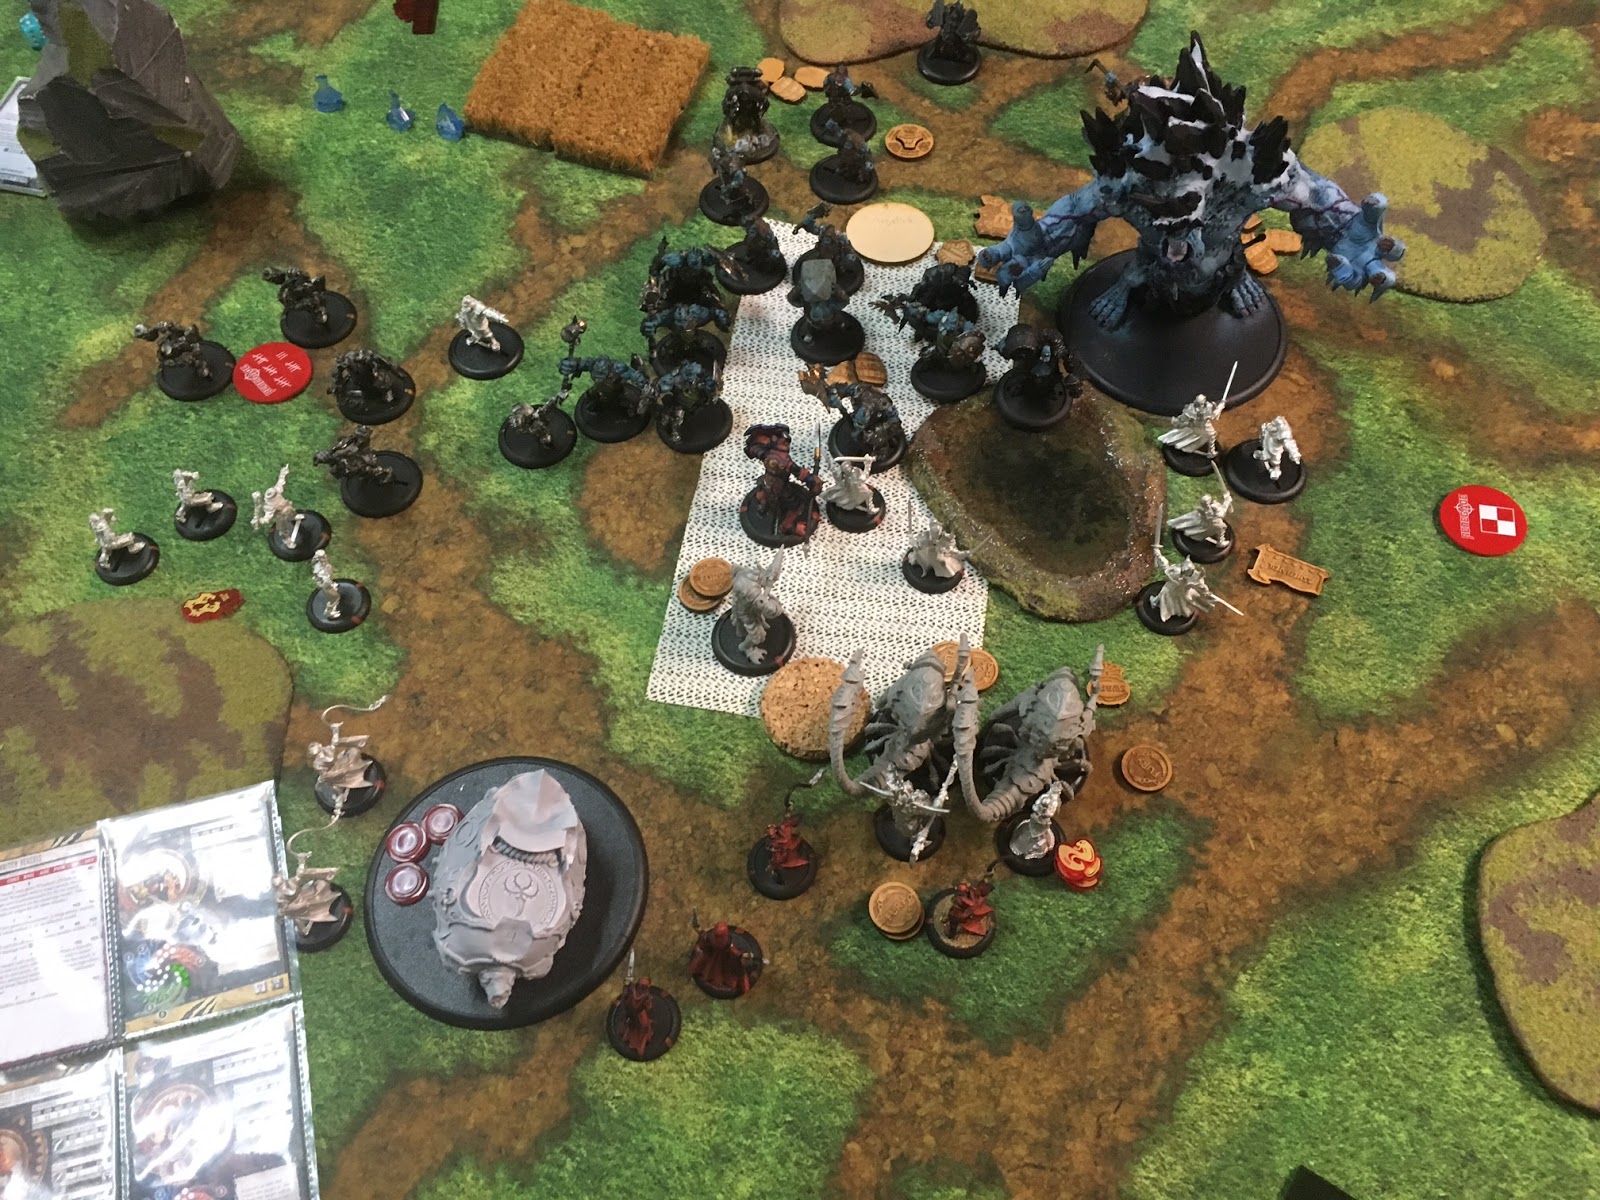
I won the roll-off, and decided to go first. I put my Animantrax in the middle, with the Keltarii and Brute to its right and the Slingers and Raider to its left. The support stuff went behind, while the Aradi paired up slightly to the right of the Animantrax.

Caleb put the Glacier King in the center-right, and plopped down all his Warders to the left of it. Madrak and the Support models (including the Axer and Impaler) went just behind them, and the Skinners split up in AD to support either side of the army.
One other note. We decided to play with Hardcore timing, so just 42 minutes per player.
Turn 1, Skorne
I ran just about everything, put Ashen Veil on the Keltarii, and put 5 Fury on the Agonizer. The Paingivers starting whipping some accuracy into the Siege Animantrax. All told, I'd be in a decent position to shoot next turn.
Turn 1, Trollbloods
Caleb ran everything up as well, and had Madrak dump a bunch of (I think all 5) Fury onto the Kriel Stone, and keep well out of LoS behind some Warders. The Warders and Glacier King ran up in a line, while the Skinners stayed ahead a bit. The rest of the Trollbloods brought up the rear, with the Kriel Stone using Combat Warding to keep Corrosion from the Slingers off.

Caleb was well out of most of my melee threat ranges, but easily within range to shoot, which was what I planned to do. Any damage I could put on the Glacier King would be good progress toward killing it off. I was not 100% confident about my attrition game against Warders, but if that Glacier King got to my lines intact it could be over for me very quickly.
Turn 2, Skorne
I leached my Fury, and upkept Ashen Veil.
The Keltarii ran up to start jamming the trolls. The Aradi and Animantrax unloaded into the Glacier King with... disappointing results. Still, damage was damage, and I'd have another turn or two of shooting to soften it up. The slingers put Corrosion on the furthest of the Warders, who were outside the Kriel Stone bubble. The Agonizer used Gnawing Pain, just in case the Glacier King charged in right away. The Paingivers put rage tokens back onto the Animantrax in preparation for next turn.

Not a bad first turn of shooting. The Keltarii were on schedule to keep the Warders off my valuable shooters, while the Slingers were on schedule to die ignominiously trying to do the same. Still, I hadn't made quite the dent in the Glacier King that I'd wanted to. How the game went would depend a lot on how the next turn went, and whether I'd be able to get the Gargantuan down to the point where I could kill it off and start focusing on the Warders. If not, my list would get swamped and taken apart in melee.
Turn 2, Trollbloods
A couple of damage on the left Warders from Corrosion. Madrak leached in his Fury and upkept Sure Foot.
The Impaler put Far Strike on the Glacier King, which killed the Agonizer. The Warders in front of Madrak charged the Keltarii and Cyclops Brute, but didn't accomplish much thanks to Ashen Veil. Madrak made the most of the space they'd left him by pushing forward, casting Carnage to give his list an accuracy buff, and using his Feat to give the trolls extra movement and attacks whenever they killed my models.
The Axer charged in and used Thresher. Between Carnage and boosting, it killed a couple, and put some damage on the Cyclops Brute. The Warders on the left charged, and killed most of the Slingers. The Krielstone advanced, and used its "no continuous effects" aura to get rid of Corrosion on the Warders who still had it. The Bouncer moved in, and tried to kill a Keltarius, but Caleb didn't feel like spending Fury to boost, so it missed.
Caleb was definitely wearing away at my jam here. I'd need to spread myself pretty thin to keep the Warders and Glacier King off my heavy shooting element, and hope that next turn's shooting could do the job. Caleb meanwhile hadn't taken much damage at all yet. Even if I could kill the Glacier King, it might not make a difference against Madrak and the Warders.
Turn 3, Skorne
Hexeris upkept Ashen Veil.
The Keltarii moved to keep the Warders off the Animantrax, and made a couple attacks. The Slingers just moved a little. The guns kept hammering away at the Glacier King, but this time the Extoller and Raider were also in range, and between them, the Animantrax, and the Aradi, they put a lot of damage on it. The Aradi continued to use Swarm, and serve as a bunker for Hexeris.

This turn had gone by pretty quickly. For one thing, I was rushing thanks to the shortened Death Clock. For another, I didn't have a lot of activations. I'd done good damage to the Glacier King this turn, but it might be too little, too late.
Turn 3, Trollbloods
Madrak leached Fury, and upkept Sure Foot.
Madrak advanced, cast Carnage, and killed a Keltarius with 2 attacks. The Skinner near the Glacier King charged the nearer Aradus Sentinel, and hit. It did a little damage, but more importantly, inflicted Hunter's Mark. Caleb's beasts could charge the Sentinel for free, and would get an extra +2" movement when they did so. The Axer, Bouncer, and center Warders moved up, and all but wiped out the rest of the Keltarii. They also put a little damage on the Brute.
The Glacier King charged the Aradus, easily making the distance. It made both bugs Stationary with its Big Frosty Fists, and killed the Aradus closer to my center. The Kriel Stone ran up, and used its aura.

Harsh. My gun line had not gotten enough work done against the Glacier King, and now I was tied down in melee. I had one hope: assassinate Madrak. It was a long shot, since he was right in the middle of melee, but it was all I had left.
Turn 4, Skorne
Hexeris dropped all his upkeeps.
The Extoller put Guidance on Hexeris (giving him Eyeless Sight and Magic Weapons, although Gulgata was already magical).
Moment of Truth time. The Cyclops Raider advanced into melee with the Troll Bouncer, and attempted a Power Attack: Throw with its oft-forgotten Open Fist. I boosted the attack roll, and hit. Then I got very lucky and beat the (stronger) troll on the opposed Strength check! I sent the Bouncer flying into the Glacier King for piddly damage, but that wasn't the point. Hexeris had an opening to attack Madrak.
Hexeris walked to the edge of his melee range, being careful not to trigger a free strike from the Glacier King. He boosted Black Spot into Madrak, and started buying attacks. After the first few, he Feated to regenerate Fury, but eventually killed Madrak.

Victory to the Skorne!
Thoughts
Well that was lucky. The Troll brick was rampaging through my army, and my only hope had rested on a Str 8 Cyclops successfully throwing a Str 9 Troll. Otherwise, I didn't play badly, but I definitely wouldn't drop this eHexy list into Trollbloods if I had a harder-hitting partner waiting in the wings somewhere. The Slingers were dead meat right off the bat, and the Aradi didn't know what to do once they were engaged in melee. Without a really solid damage buff besides Enrage, they can't handle heavy armor. Still, I played it tricky, and luck was with me.
I like this list. It sure didn't work out against the Troll brick, but 2x Aradus Sentinel backed up by a Siege Animantrax makes for a good firebase. The Keltarii are an amazing Ashen Veil unit. Very hard to remove on the approach thanks to Blade Shield, and they really spread that -2 to hit debuff around with Parry. One thing I'd probably like to have in this list is a unit of Croak Raiders if I'm planning to do any kind of anti-armor shooting. They can really tear things up with their boosted Pow 12's.
Caleb played a good game overall, but left Madrak out in the cold on his last turn. If he'd played Madrak a little further back, I would have had no hope at all, and the Glacier King and Warders would have rolled right over me. He had the advantage, and he used it well. Even with Madrak a little too close to the front, it would have been over for me if the Cyclops Raider hadn't managed to throw the Bouncer.
As for this list, it performed fine when Warders had Weapon Master. Now, post-nerf, I'm not sure at all. Warders might still have a place as an armored screen, but probably just one unit. The other should probably become a heavy to put some armor cracking back into the list.
Does the Raider actually have an open fist to do throws with? He has his ranged weapon in one hand and his melee weapon in his other hand, but neither looks to be an open fist unless I missed something.
ReplyDeleteAlso, how were you putting rage tokens on the Animantrax with the Paingivers? I wouldn't think they could crack it's armor enough to put damage on it. Plus it's not living, so they can't rely on Anatomical Precision to put damage through...
Nevermind re: the Raider. I just looked the card up again on Warroom and realized the arrow showing that you can flip the card over had been obscuring the open fist symbol. I'll be damned. Gonna have to remember that trick in the future.
DeleteNevermind re: the Raider. I just looked the card up again on Warroom and realized the arrow showing that you can flip the card over had been obscuring the open fist symbol. I'll be damned. Gonna have to remember that trick in the future.
DeleteDoes the Raider actually have an open fist to do throws with? He has his ranged weapon in one hand and his melee weapon in his other hand, but neither looks to be an open fist unless I missed something.
ReplyDeleteAlso, how were you putting rage tokens on the Animantrax with the Paingivers? I wouldn't think they could crack it's armor enough to put damage on it. Plus it's not living, so they can't rely on Anatomical Precision to put damage through...
Hi!
ReplyDeleteYup, the Raider has an Open Fist, as you saw.
The Paingivers have Anatomical Precision, and the Animantrax is technically a living model. Even being a battle engine, it *is* living unless it has the Undead or Construct advantage, or it says on the card that it's not a living model.
This puts it in the fairly silly position of being able to be damaged by Paingivers (which does make sense) for Rage tokens, and being able to be repaired by the Gobber Tinker, who can repair all battle engines thanks to the Mekanically Adept rule. Which is... pretty strange, but not as strange as the fact that it can also repair Xerxis 2!