Makeda and the Exalted Court (*24pts)
*Mammoth (38pts) - Proxied by the Siege Animantrax again
*Molik Karn (20pts)
*Titan Gladiator (14pts)
*Cyclops Brute (8pts)
*Agonizer (7pts)
Orin Midwinter, Rogue Inquisitor (5pts)
Paingiver Beast Handlers (Leader and 5 Grunts) (7pts)
I've only had one game with the list so far. The main idea is to use Hand of Death to be able to get Grievous Wounds on either the Mammoth or Molik, and use the Mammoth as an anchor for the rest of the list. The Brute helps defend and deliver the Mammoth, and Molik and Makeda use their abilities to attack, and then return to the Mammoth's punishing threat range. The Gladiator is a second line hitter, and makes everyone better with Rush.
My opponent, Ethan, was running Calandra 1 with the following list.
Calandra Truthsayer, Oracle of the Glimmerwood
*Rok
*Dire Troll Mauler
*Troll Bouncer
*Trollkin Rune Bearer
Braylen Wanderheart
Janissa Stonetide
Trollkin Highwaymen (Leader and 9 Grunts)
*Trollkin Sorcerer
Northkin Fire Eaters (Leader and 2 Grunts)
Northkin Fire Eaters (Leader and 2 Grunts)
Kriel Stone Bearer and Stone Scribes (Leader and 3 Grunts)
Dhunian Knot (Leader and 2 Grunts)
This seems like a standard Calandra attrition list. The game plan will be to turn things around with Befuddle, and let the Highwaytrolls and Braylen kill them off from range. Anything that needs serious armor cracking gets either the Mauler or Rok. Calandra and the Knot provide accuracy bonuses, and Calandra gives a huge Def bonus with Start Crossed. The Fire Eaters seem like good speed bump and troubleshooting units.
Scenario and Deployment
On to the game. We rolled up the Take and Hold scenario. There are two flags diagonal from each other across the table. Dominate the friendly flag or control the enemy flag for 1pt. Dominate the enemy flag for 2.
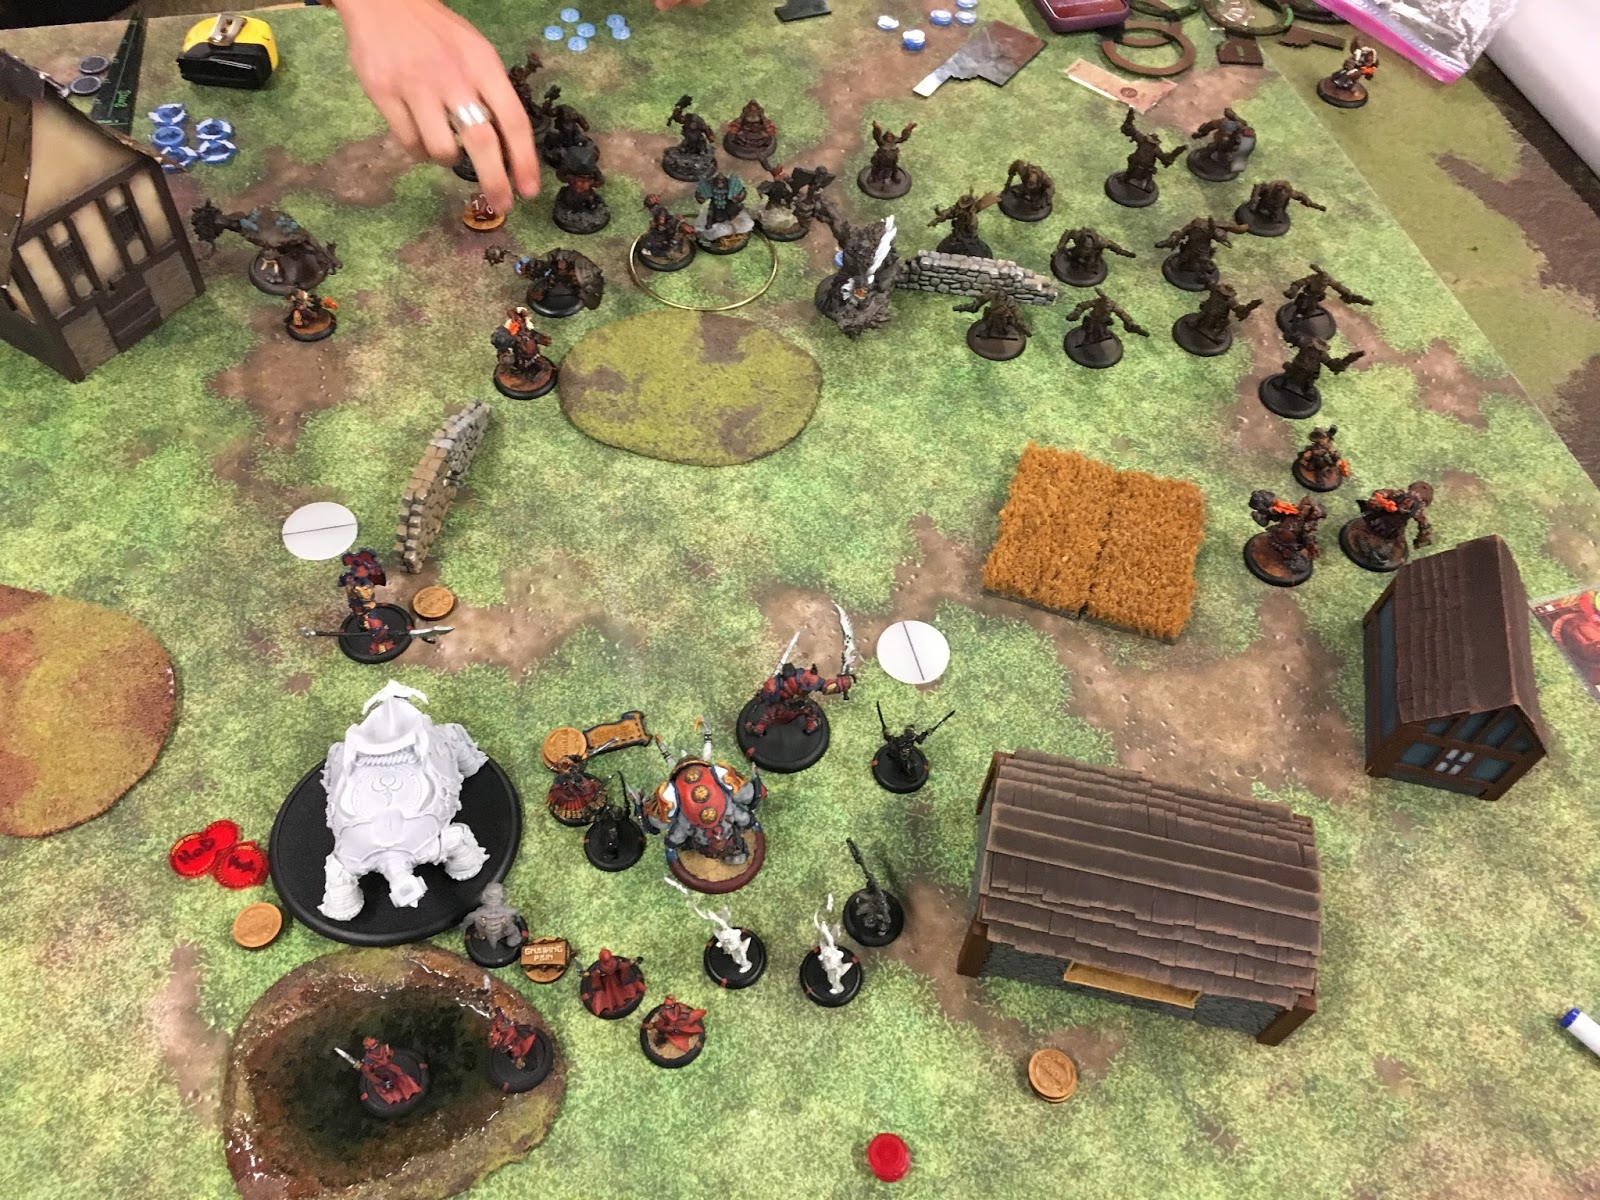
I won the roll-off, and decided to go first. Ethan chose the table side with a nice forest to hide Calandra behind.
I deployed my Mammoth in front of a lake, then put the rest of my list between the Mammoth and a pair of houses on my right. The only exception was the Brute, who went to the left of the Mammoth.

Ethan deployed the Mauler and Rok pretty centrally, along with Calandra and the support staff. The Highwaytrolls and Breylen went on the right, and one unit of Fire Eaters went on each side.

And with that, we were ready to go.

Skorne Turn 1
I mostly ran. Makeda and her unit walked. Makeda cast Hand of Death on Molik, Vortex of Destruction on herself, and Fate Walker on herself for a little extra movement. The Gladiator Rushed the Mammoth, and Trampled forward. Everything else ran except the Paingivers, who Conditioned the point or so of Fury I needed them to.

I wasn't loving the amount of firepower the Highwaytrolls, and my opening moves were partly engineered to keep them and the Fire Eaters at bay with Molik's threat range. Otherwise, not bad. The Mammoth was in a pretty commanding part of the table, and I was pretty well poised to go for either flag depending on how the turn shook out.
Trollbloods Turn 1
A lot of running. Calandra put up Star Crossed, and cast Bullet Dodger on Rok. The Fire Eaters ran forward pretty cautiously, not wanting Molik to get the jump on them. The Highwaytrolls started a sprint around my right flank with Braylen. The two heavies went to either side of the forest, the Mauler opposing the Mammoth, and Rok going against Molik. The Support stayed in the back, although the Stone did use its aura.

Playing it pretty safe, eh? Well, I'd try to get in toward the middle, and put some shots out with my Mammoth. Hopefully, that would force the Trollbloods into an attrition fight on my terms.
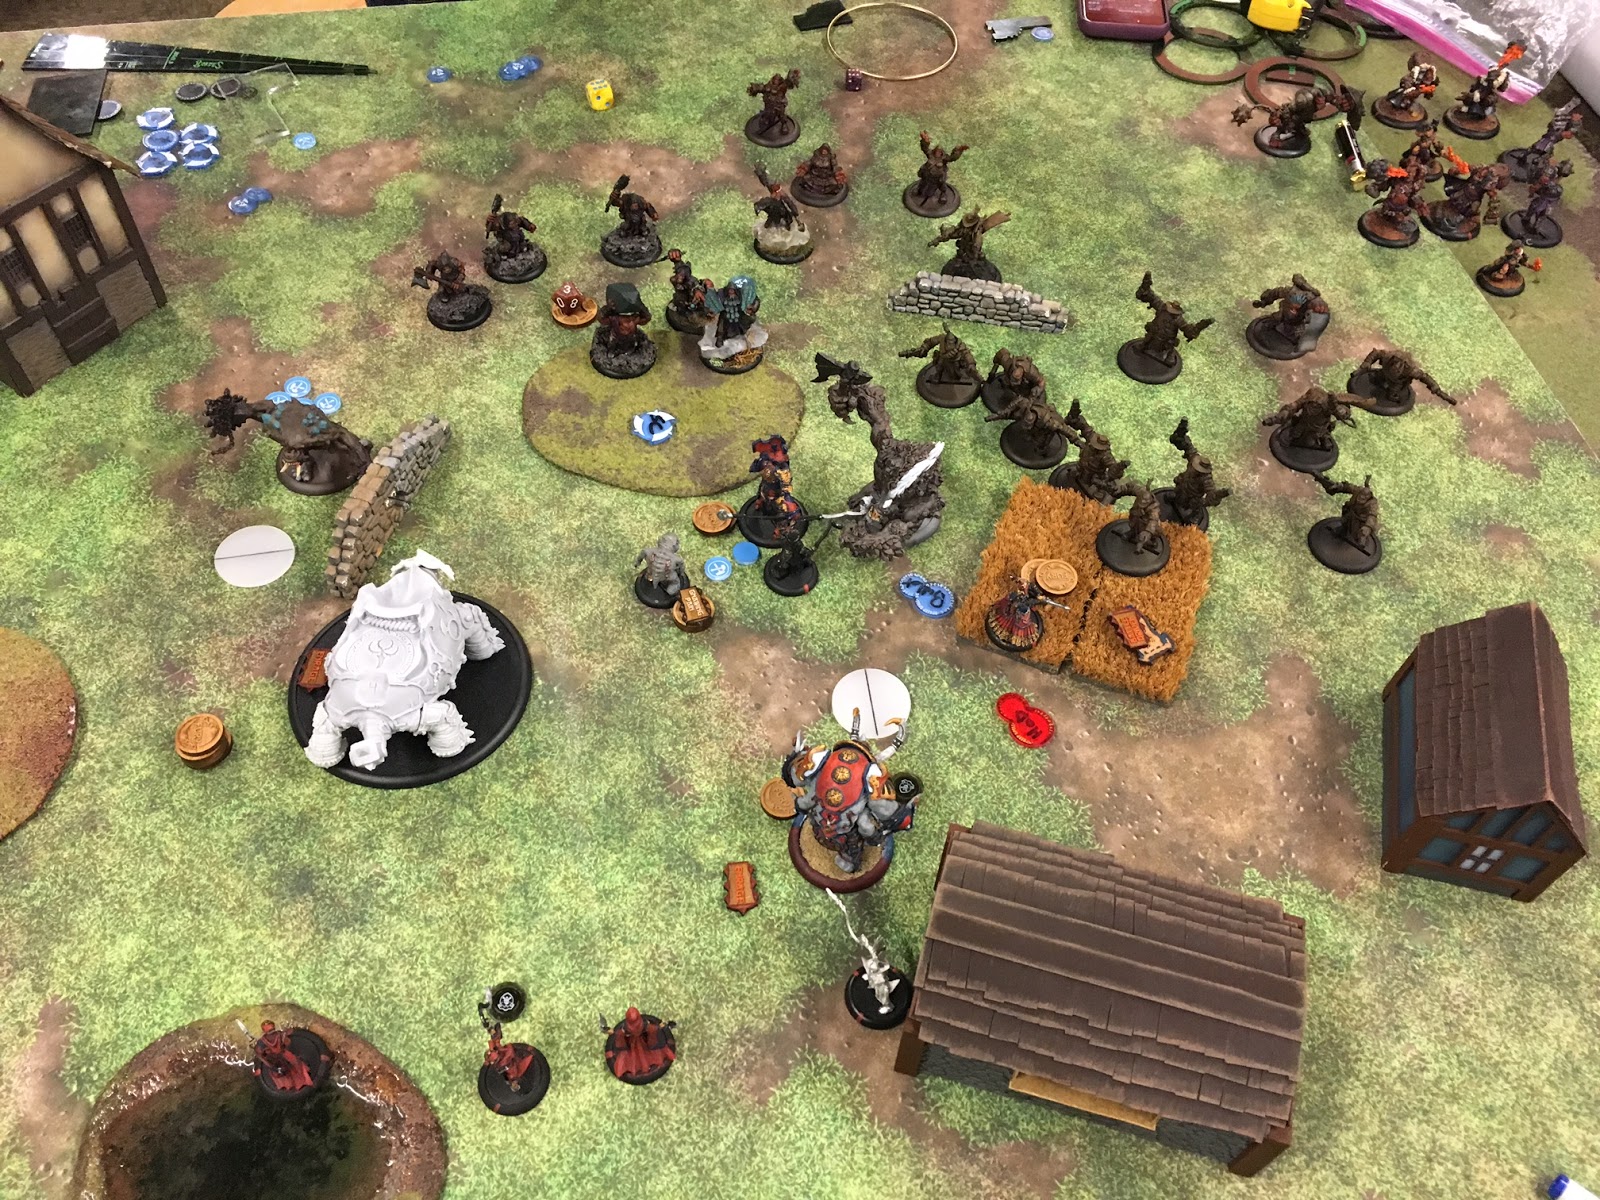
Skorne Turn 2
Makeda upkept Vortex of Destruction, but dropped Hand of Death.
Makeda switched Hand of Death over to the Mammoth. I advanced everything pretty cautiously. The Brute got just out of charge range of the Mauler, screening the Mammoth. The Mammoth tried to clear out some Fire Eaters, and after directing 4 shots their way, killed one. The Agonizer backed the Mammoth with Gnawing Pain, and Orin ran to where I thought he'd be safe, and able to protect Molik from Befuddle.
If everything worked out, I was in an ok spot. The Mammoth's damage output hadn't been great, but it was really threatening Ethan's flag with its presence.
Trollbloods Turn 2
Ethan had a plan. Calandra upkept Bullet Dodger.
It turned out that Orin wasn't as safe as I'd thought, and a Fire Eater was able to draw line of sight to Assault him. The right Fire Eaters charged, did 1 damage to the Exalted Guardian, lit the one targeting Orin on Fire, and killed Orin. Yikes. The Dhunian Knot put Puppet Strings on Calandra, the Rune Bearer, and Rok. The Rune Bearer walked forward, and targeted Molik with a Befuddle. Double Yikes.
What followed was an epic duel of rerolls. See, Molik has the Intuition ability, which lets me force him to make my opponent reroll attacks that hit him. The Rune Bearer had Puppet Master, allowing it to reroll an attack or damage roll. Finally, Calandra has Fate Blessed, so she can spend a point of Fury once per roll to allow a model in her CTRL to reroll an attack or damage roll. I ended up maxing out a previously empty Molik, and Calandra ended up spending 3 Fury (which technically she couldn't have but we were both so excited by the prospect of dueling rerolls that we forgot how her ability worked), finally resulting in a Befuddled Molik Karn wandering backwards toward Rok and the Highwaytrolls.
Triple Yikes.
The Highwaytrolls and Braylen opened up on Molik, did some good damage to him, and killed the second Exalted Guardian (who Shield Guarded one of the shots). Rok charged Molik, and finished him off.
The remaining 2 Fire Eaters charged, and set the second Exalted on fire. The Stone used its aura, and ran to catch Rok and the Mauler. Calandra cast Star Crossed with her remaining Fury, and hid behind the hill camping one. Janissa advanced. The Bouncer ran up to a supporting position in the middle of the table.

If I could kill Rok, I would still be in an ok position. Losing Molik was a blow, but it was one I'd survived before. Furthermore, once Rok was out of the equation, I could focus my attention on the Mauler, whittle down the ranged element, and be in a very dominant position. If I didn't screw up.
Skorne Turn 3
Makeda dropped her spells, and leached Fury.
The Brute ran to box in Rok. Then Makeda's unit activated. I had Makeda charge one of the Fire Eaters, and Feat, while her Exalted Guardian charged Rok. Makeda cast Hand of Death on herself before making her initial attack. She needed a 5 under Star Crossed and missed.
Then we made another rules error. Makeda needs to finish her combat action before her Exalted Guardian could make her initial attacks, and I should have been able to buy more attacks on the Fire Eater, and get Makeda into Rok with Overtake, which was my cunning plane. However, Ethan said I needed to take the Exalted's initial attacks before Makeda could buy attacks, and I forgot that that wasn't the case.
Well, the Exalted missed her 6, and Rok glibly dodged away with Bullet Dodger, thus ruining my plan to come out ahead on attrition. I took the rest of Makeda's attacks to kill a couple more models, and left her on no Fury engaging a Highwaytroll.
The Paingivers Enraged the Mammoth and Gladiator, who cleared out the Bouncer and all the remaining Fire Eaters, bringing Makeda up to 4 Fury. The Agonizer ran forward, trying to help everyone, and used Gnawing Pain.
This is not a good place to be. If Makeda lives through everything Rok and Calandra can throw at her it'll be the best luck I've had with her since that one time she took the full force of eGaspy's MkII Feat to the face and somehow lived.
Trollbloods Turn 3
Calandra leached her Fury and dropped Bullet Dodger.
The Highwaytrolls cleared out, one dying to a free strike, and the others putting some damage into Makeda with CRA's. Braylen missed Makeda twice. Calandra activated, Feated, and knocked Makeda down with Misfortune, then cast Rage on Rok.
Rok charged Makeda.
Makeda did not survive.

Victory to the Trollbloods!
Thoughts
I didn't play a great game here, and misplaying two critical rules certainly didn't help me out. My biggest mistake was not thinking through my activations with Molik and Orin. I really need to get it into my head that I do not need to be so aggressive with this list. If I'd held back even a little with Molik, I could've easily avoided that Befuddle. If I'd just double checked the angles with Orin, I could've gotten him into a place where he was out of LoS to the Fire Eaters, especially if I'd considered Molik's activation too. This list is a shoot and counter list, and I need to start playing it that way. This game, I ended up leaving Molik too exposed, even if he should have escaped that Befuddle attempt. There are other ways I could have played to scenario, and I'd be interested in a rematch to see what could have happened.
On to the list. I really feel like I need more screening, which means (unfortunately) that the Gladiator should probably take the cut. I like Rush, and I like the second heavy besides Molik, but I'm really having trouble making the list work the way it's currently set up. Karax might be a solution. Or another Brute and something else. I could really do a number on the list, and add more shooting. Gun bugs, despite being pretty bad right now (fingers crossed for them getting an Animus, which could really save them), might be a good fit. A Mammoth and 1-2 Aradus Sentinels backed up by Makeda might be a real threat to several kinds of list. That said, maybe I just need to work on this configuration, come up with a good plan, and of course, remember my rules. Any advice on running the Mammoth with Mak3 would be super appreciated though.
Ethan played a solid game, working the threat of the Highwaytrolls down 1 flank while he waited for me to overextend. I played right into his hands, and he capitalized big time, spraying down Orin, and killing Molik. He kept out of my threat ranges until he was ready to commit, and even managed to save Rok with Bullet Dodger. That said, I really do feel like my mistakes cost me the game. He just played solidly while Star-Crossed and shooting did their work.
His list is really good. I like Highwaytrolls a lot with Calandra, and the Rok/Mauler combination combined with the threat of Befuddle to suck out enemy heavies allows the list to deal with armor a lot better than it seems like it should. I don't know that the Dhunian Knot is necessary as opposed to other Trollish options, but Ethan certainly got good use out of it this game.
I'll be back on Friday with some tactics or something. My next report will probably be with a list that clicks for me a bit more, like my current Makeda 2, Hexeris 2, or Morghoul 1 lists. I've also been itching to try out an updated version of the Brute Squad as well as Fabint's Makeda 1 list.
I guess we'll all have to wait and see what I end up playing. Thanks for reading!
Wise Blood here. Intuition on Molik can force rerolls only once per turn. Seemed like that rule got misplayed in your bat rep game
ReplyDeleteMolik's Warroom card says:
DeleteIntuition - When an enemy model targets this model with an attack and the attack roll results in a hit, you can immediately force this model to cause the enemy model to reroll the attack.
Nothing in there about once per turn or even once per roll. The description of rerolls in Warroom's version of the rules doesn't limit rerolls to once per hit per effect either.
Was there a ruling on this that hasn't been included in a Warroom update yet?
A little off topic, but what are you running with Makeda 3 right now, if you are playing her?
DeleteOk, more rules checking re: Intuition.
DeleteA look at the Attack Sequence in "Appendix A: Timing" suggests that Molik *can* use Intuition more than once per roll. Here's the relevant section.
Attack Roll
a. Resolve effects which change the number of dice rolled, such as boosting the roll.
b. Roll the dice.
c. Resolve effects that remove dice from the roll.
d. Determine if the model would be hit or missed by the attack roll against it.
e. Resolve effects that cause the attack roll to be rerolled. Return to step b if needed.
So here's the sequence as I see it: Steps a-d play out, and in step d, it is resolved that Molik (or a Brute) would be hit. In step e, Molik is Forced to use Intuition. This returns the sequence to step b, and steps b-d are resolved again. If in step d it is resolved that Molik would be hit again, he can be Forced to use Intuition again, as long as he could be forced.
@ Any new players reading these comments: Hopefully you won't need to delve into the minutia of the timing sequence too often, but it is all in the rules in Appendix A, and can answer some prickly questions.
I feel really bad now that you point out I made two rules errors! I must have been mixing up rules for beast initials and units assaulting and then pasted some bonkers amalgam onto warcaster units.
ReplyDeleteYour list definitely kept me on my toes positioning-wise.
Thanks for the comment!
ReplyDeleteNo worries about the rules errors. I really should have caught the combat action one, since I've had to keep it in mind for timing Mak 3's Feat.